Earbuds are a popular choice for listening since ancient times. Sales of wireless earbuds exploded after Apple discontinued the iPhone 7's headphone jack and introduced AirPods. Every brand has released wireless earbuds since then. Some brands have even been resurrected. Some are small and inexpensive. Some are large and costly. Some are made of one-size-fits all hard plastics. Some are user-replaceable rubber tips, which can be adjusted to fit different sizes of ears. One thing unites all earbuds: eventually they become disgustingly gross. This can lead to a decrease in sound quality and a reduction in volume output. It is important to clean your earbuds every once in a while.
We will be covering a variety of cleaning methods for your earbuds, including soft rubber-tipped and hard plastic. These can all be done using simple tools that everyone can use. We want to make sure your earbuds are clean and free from damage.
A word of caution
Most manufacturers recommend cleaning your earbuds using a microfiber cloth or a dry cotton swab. Major manufacturers such as Samsung and Apple recommend that you avoid using any liquids or rubbing alcohol. While a simple alcohol wipe may be sufficient for some surfaces, it is best to keep away from speaker grills, microphone holes or charging ports. However, there are some dangers. You are responsible for your actions if you use any cleaners or wet processes. It may seem obvious, but it is important to remember: Never submerge charging cases or earbuds in any liquid for cleaning.
Start with the basics
When cleaning electronics, a "less is more" approach works best. Let's start by examining the easiest and most risk-free ways to clean earbuds. Start with the simplest cleaning tools, and then work your way up to fully clean the earbuds. If a little bit of air suffices, there's no reason to be too thorough with your toothpick. Start small and only use what is necessary.
Many of these tools are household staples. Although you can purchase cleaning kits for earbuds with a variety of tools, you might already have the right tool.
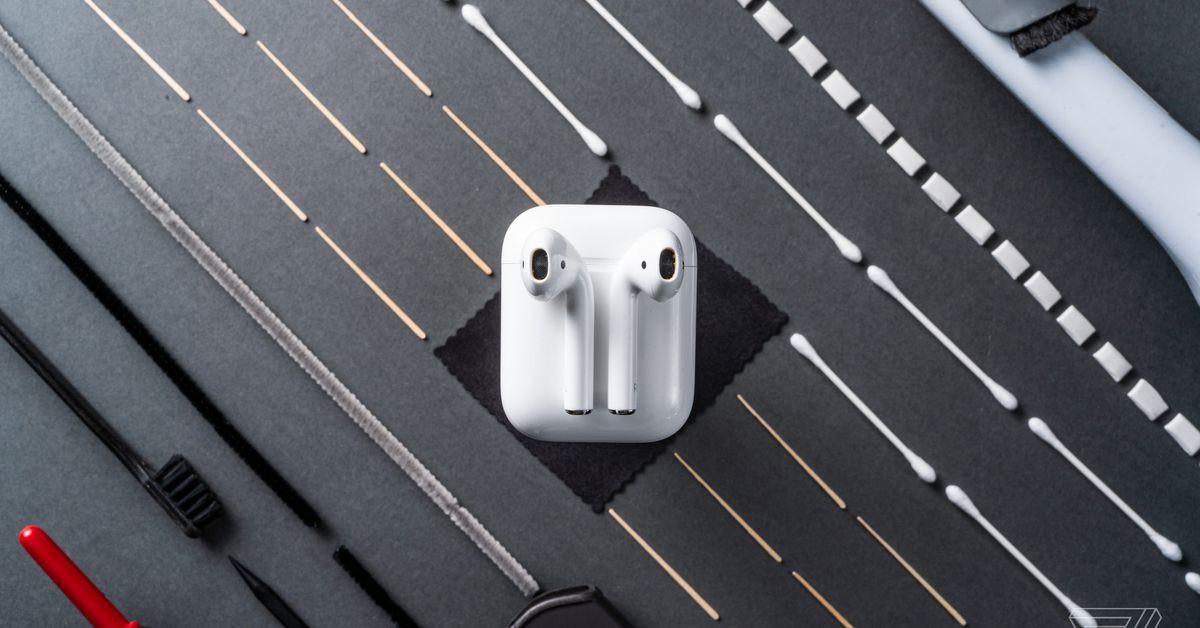
Forced air
Grid View Blow the air into the microphone holes and speaker grills. Allow any debris to fall from the earbuds.
Blower air down through the opening in the soft rubber earbud tips. Turn the earbud tip over and do it again.
Take out the earbud tips and blow air upwards into the speaker grill until dirt is gone.
To force out dust and debris, blow air into the charging case. To remove any dirt, use a cotton swab or microfiber cloth.
Although blowing air into your ears may remove some dirt or flakey wax, it is unlikely to be sufficient. You could also accidentally deposit small bits of saliva on something that will go in your ears. Here are some other options:
A bulb / rocket blower
Canned air
Hard plastic earbuds can be aimed at the floor by pointing the speaker grills away. Point the blower upwards and into the earbud speaker grills. You want to keep debris from flying towards your eyes.
If you have earbuds that have removable soft rubber tips, slide them off and place the tip on the floor. Blower air through the opening at the tip of the earbud, pointing down and away from your face. Turn them upside down and blow air through one side. Next, move to the earbuds themselves and clean out debris. The rubber tips can be removed from earbuds. They are the only part that you can clean with liquids. To ensure that there is no moisture left behind, clean the tips with water. Dry them overnight before putting them back on your earbuds.
If you feel that this is sufficient to remove the debris and make your earbuds look clean, then apply a microfiber cloth to all surfaces to clean them. Keep your blower or canned air handy if the buildup continues to be stubborn.
Make sure to charge the case. Forced air and a microfiber towel are often enough to remove any dirt from wireless earbuds.
Toothpicks, cotton strips, and other scraping and brushing instruments are available.
Grid View Use a toothpick or a soft scraper to remove earwax and other grime from the corners.
Toothpicks can be used to remove ear wax buildup from soft rubber earbud tips.
After the soft tip has been removed, remove any debris from your inner speak grill.
To remove dirt and grime, use a cotton swab. Make sure to not push the debris further into the speaker grill.
Cotton swabs are used to push and pull loose material from the tips of earbuds.
Clean the speaker grille and surrounding areas. Earbuds that are focused on fitness and sports can accumulate a lot of debris and wax.
You can get rid of a lot of the loose debris by simply cleaning your toothbrush with water. To reach every corner and side, alternate between brushing in different directions.
A toothbrush is an excellent follow-up to using a scraper tool to remove dirt. Make sure you reach all the nooks and crevices beneath your earbud tip.
A microfiber cloth removes any untidy debris from scrapers or brushes.
Plastic spudgers are a great alternative to toothpicks. They usually have one side that is fine.
The plastic spudger can be strong, but it is gentle enough not to damage smaller speaker grills.
Pipe cleaners are useful for cleaning small spaces. However, due to their core of metal, they should not be used on any soft-rubber parts, such as removable earbud tips.
Earwax can be built up by rubber wings and combs that keep fitness buds in their place. Pipe cleaners are a great tool to help clean this mess. Make sure to clean every hole and gap.
For stubborn buildup, a puff of air is not enough, especially if your ears are very waxy. Next, you will need to remove the ear wax or other debris. This step is not dangerous. Be careful when you are going to pick up an electronic piece. These tools are helpful:
Cotton swab
Toothpicks made of basic wood or plastic
Plastic spudger (similar to the one iFixit provides with many DIY repair tools)
Wooden skewer is used primarily for cooking and food preparation
Use a dry brush (toothbrushes) for your dental care.
Pipe cleaner (the arts-and-crafts kind)
We are selecting tools that are either soft (cotton, brushes), or that are firm, but not too hard (wooden, plastic), because metal can cause damage to speaker grills and plastic shells of earbuds. We want to start with the least intrusive and move up if necessary.
Start with the cotton swab to clean hard plastic earbuds. Use the swab to remove wax and debris from the grills. To let gravity work for you, angle them down. If the swab does not have enough strength, you can use a toothpick or spudger to remove any buildup at the edges and corners of the speaker's cavities.
The toothpick is a good tool for soft rubber tips. It can be used to fit through an earbud tip that has been detached and then scrape the inside wall. If wax has been left on the speaker, you should also clean it with a cotton swab or brush. These earbuds may have a rubberized fin to secure them in your ear. These soft rubber bits can also be cleaned with a pipe cleaner, although it is not recommended to be used for anything else due to its core of metal rods.
After you have removed the buildup, continue blowing air with a can of compressed air. Use a polishing cloth on all surfaces to clean your earbuds.
Bonus tip: A dampened sponge or paper towel can be used to wipe off any food residue on your toothpick. You might be surprised at how much stuff comes out of long-neglected headphones if you don't clean up your workspace.
These are the final tools to help with difficult-to-reach cleaning tasks
Grid View Roll the putty in your hands and heat it up. Then insert it into the speaker grill and remove dirt and debris. To ensure that there are no pieces left behind, slowly and carefully remove the putty.
You can use putty on the inside of speaker grills and clogged mic holes. Putty that has become clogged with dirt and dust should be disposed of.
You can remove buried grime from the speaker grill using Putty.
There are two options if you have difficulty getting rid of dirt from your garden. These tools can be used together with the others:
Use masking tape or painter’s tape
Mounting putty or cleaning gel
Use a small attachment for your vacuum
Tape or putty can be used to pull out dirt from deeper recesses. This will hopefully clean your earbuds completely. The adhesive of painter's or masking tape is strong enough to grab dirt, but it is light enough not to leave any residue.
The tape might not reach dirt that is very deep into the earbud tips. Putty, which is used in arts and crafts to safely mount things to the walls) or a cleaning solution can be used. Use a little bit of the putty to warm it up, then roll it on the area.
The combination of these tools should remove most earbud gunk. For some buds, repeated, alternate use of air, scraper and putty may be necessary. It is important to keep working at it until your earbuds become clean.
Grid View The right-hand side shows the cleaning process. It is shown in a step-by-step manner. For comparison, the uncleaned earbud can be found on the left.
Here's the same earbud after a quick clean using some of these tools and methods. It's amazing how much a quick cleaning can make a big difference.
You will see a decrease in dirt buildup and need to use fewer tools and elbow grease to clean your earbuds. You can ensure that your earbuds last longer by not allowing them to get too dirty. They will also be less likely to break or lose their sound quality.
Preventative care is a good idea to avoid costly repairs and replacements later. When not in use, keep your wireless earbuds safe from dirt and dust.