:format(webp)/cdn.vox-cdn.com/uploads/chorus_image/image/70430028/Screen_Shot_2022_01_25_at_10.47.48_AM.0.png)
A colleague was really annoyed and had to let off steam. When my colleague opened the article, he found someone who was definitely not on our staff reading it.
What had happened? The writer made the document public so that anyone could have access to it, even if they were not related to him. This made the article available to anyone before it had been edited and published, something no publication wants, but opened it up to all sorts of shenanigans.
In June 2021, an editor accidentally sent a link to a document to their followers. It was a good idea to publish the news to the web in the meantime, since The Verge's site was temporarily down. Merriment began.
If the link to the document is passed around, it can lead to problems. When you first create a Google Doc, the software will only let you share it if you explicitly request it. If this is a business account, the administrator may have changed the default so that it is automatically shared by others in your company. You have to make the document public.
Here is how you can share your document with others.
Click on the Share button in the upper right corner if you want to share the document.
:format(webp):no_upscale()/cdn.vox-cdn.com/uploads/chorus_asset/file/23193499/Screen_Shot_2022_01_24_at_11.04.46_AM.png)
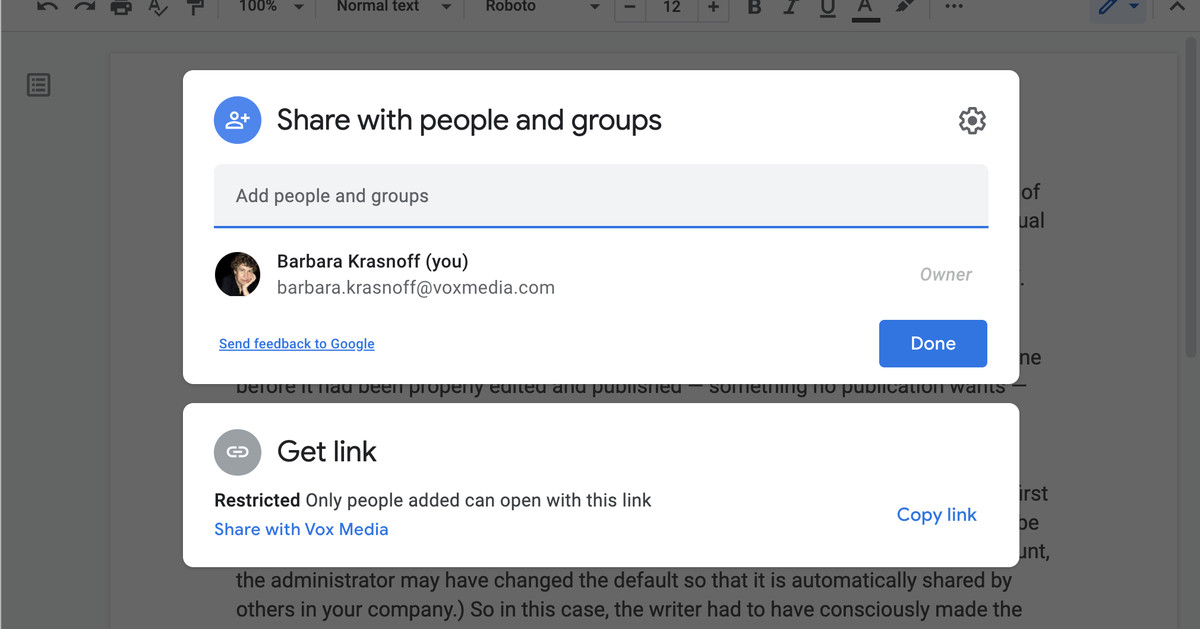
You will get a pop-up window that says "share with people and groups."
:format(webp):no_upscale()/cdn.vox-cdn.com/uploads/chorus_asset/file/23193505/Screen_Shot_2022_01_24_at_11.05.08_AM__1_.png)
The person or groups name should be typed just below that. If that person is in your contact list, their name will show up, but you can type in their full email address. All those you have added will get the same type of access to the document, even if you type in more than one name. We will talk about access in a second.
:format(webp):no_upscale()/cdn.vox-cdn.com/uploads/chorus_asset/file/23193507/Screen_Shot_2022_01_25_at_9.16.38_AM.png)
When you add at least one name, you'll see a box to the right that says "Editor." Click on that for a drop-down menu that lets you select the type of access that you want. These include:
:format(webp):no_upscale()/cdn.vox-cdn.com/uploads/chorus_asset/file/23193509/Screen_Shot_2022_01_25_at_9.20.56_AM.png)
It is a good idea to pick the most restrictive type that is practical for your use case. If you don't want them to make any changes without your approval, then commenter status is better.
If the people you've shared the document with have changed it but didn't tell you what they did, go to the version history.
:format(webp):no_upscale()/cdn.vox-cdn.com/uploads/chorus_asset/file/23193512/Screen_Shot_2022_01_25_at_9.24.21_AM.png)
The settings icon in the upper right corner of the pop-up box can be used to adjust the amount of access that editors, commenters, and viewers have to your document. You can prevent editors and commenters from being able to download, print, and copy the document if you uncheck the boxes in the settings pop-up.
:format(webp):no_upscale()/cdn.vox-cdn.com/uploads/chorus_asset/file/23193514/Screen_Shot_2022_01_24_at_2.09.04_PM.png)
If you want to send people an email about the document, make sure theNotify people box is checked.
Wait, there is more.
You can copy the link to your document from the Get Link section below. The document can only be seen by those you have shared it with. You can use the Get Link section to make the link more accessible to more people.
:format(webp):no_upscale()/cdn.vox-cdn.com/uploads/chorus_asset/file/23193518/Screen_Shot_2022_01_24_at_2.11.42_PM__1_.png)
You can change it to anyone who has the link. You can adjust access so that people have access to either Viewer, Commenter, or Editor.
It is possible to share a document on a mobile device.
:format(webp):no_upscale()/cdn.vox-cdn.com/uploads/chorus_asset/file/23193671/Screenshot_20220125_101726.png)
:format(webp):no_upscale()/cdn.vox-cdn.com/uploads/chorus_asset/file/23193686/Screenshot_20220125_102549.jpg)
:format(webp):no_upscale()/cdn.vox-cdn.com/uploads/chorus_asset/file/23193674/Screenshot_20220125_101819.png)
:format(webp):no_upscale()/cdn.vox-cdn.com/uploads/chorus_asset/file/23193610/Screenshot_20220124_142714.jpg)
:format(webp):no_upscale()/cdn.vox-cdn.com/uploads/chorus_asset/file/23193595/Screenshot_20220124_142855.jpg)
:format(webp):no_upscale()/cdn.vox-cdn.com/uploads/chorus_asset/file/23193693/Screenshot_20220125_100855__1_.png)
All Rights Reserved © 2024